Analyzing competitive plays with Shadow Demon (updated for 6.81), by Peppo_o'Paccio
Peppo_oPaccio
May 1, 2014
Introduction
 Shadow Demon (also known as SD) is one of the most picked supports in the current meta for offensive purposes: personally he's my favourite support, and with his skill arsenal he can change the tides of a fight even if underfarmed or without items.
In this guide I'll talk about the competitive way to play him, so don't expect tips for a dual support-carry safe lane.
Pros and Cons
Pros
- Not very squishy
- Ridicolously item independent
- One of the strongest trilane offensive supports and roamers
- You can adapt the skill build according to the situation
- Can play the whole match with just plain boots and Wards
- Can put more enemies in a bad situation at the same time
|
|
Cons
- Not tanky
- Can be easily countered with stuns
- Can't stun (though he can disable)
- Can't be played well without teammates assisting you
|
Items Explanation: Trilane Hard Support
This is the cookie-cutter playing style of Shadow Demon: you'll (almost) always see competitive SD players use this kind of build. As this Hero doesn't need any items besides Boots to go well, this is the most suitable playing style for a serious team.
You might want to know the most common warding spots and to improve your map awareness (so you will use your TP scroll wisely) before trying this, that's why I consider this build for intermediate to competitive players.
But, if you are new to this hard-supporting role don't be afraid to try this Hero: Shadow Demon is one of the best hard supports for beginners as he will let you get both easy counterwarding capabilities (thanks to his scouting  Shadow Poison) and gold from assists. In a few matches you'll become a ganking and warding master!
Starting items
Choice 1
Choice 2
Early game items
Situational

|
|
If your carry is free farming and you can go to gank other lanes, in the early game you can use a Smoke of Deceit on you and the other lane support and gank the enemy mid or solo laner: if ganking mid, a kill is almost always ensured if your mid laner helps both of you. You might end up destroying the enemy tower straight after it, too.
|
Mid game options
These are extensions, don't buy all of them! Pick just one of these items if you are playing ok or buy even two of them if you feel your team has the upper hand.

|
|
This item is not very common on Shadow Demon players but can make the difference, especially if you went really well in the early game. Plus, you can make your "Dirsupt rescue" very effective if you push your teammate (or yourself) towards your base after trapping him (or you) inside your spell.
Remember, only buy this if you played really well in the laning stage.
|

|
|
A rather common pickup for utility Heroes and hard supports, this item gives you many benefits including stats, an aura and an active ability; it's also made from cheap components that you can buy separately. So, if you haven't bought this before why don't you to it now?
|

|
|
Probably the most common extension for these kind of supports in competitive games: it gives you a ton of stats along with the best active ability for squishy INT supports that always get targeted by the enemy carry. The downside? It consists of one big expensive item.
|
Situational
Items Explanation: Trilane Support with Mekansm
Sometimes, when you're playing with another support that most likely won't buy a  Mekansm such as
  Nyx Assassin, a supportish
  Sven or a
  Tidehunter you have to do so: considering that your lane will probably be getting kills you should be able to finish it in a little amount of time.
This skill build is suitable for any kind of players, from the beginners to the professionals; remember anyway that you should actively use your TP Scroll, so a bit of map awareness is required.
Starting items
Choice 1
Choice 2
Early game items
Situational
|
|
|
If your carry is free farming and you can go to gank other lanes, in the early game you can use a Smoke of Deceit on you and the other lane support and gank the enemy mid or solo laner: if ganking mid, a kill is almost always ensured if your mid laner helps both of you. You might end up destroying the enemy tower straight after it, too.
|
Mid game options
These are extensions, don't buy all of them! Pick just one of these items if you are playing ok or buy even two of them if you feel your team has the upper hand.
|
|
|
This item is not very common on Shadow Demon players but can make the difference, especially if you went really well in the early game. Plus, you can make your "Dirsupt rescue" very effective if you push your teammate (or yourself) towards your base after trapping him (or you) inside your spell.
Remember, only buy this if you played really well in the laning stage.
|
|
|
|
A rather common pickup for utility Heroes and hard supports, this item gives you many benefits including stats, an aura and an active ability; it's also made from cheap components that you can buy separately. So, if you haven't bought this before why don't you to it now?
|
|
|
|
Probably the most common extension for these kind of supports in competitive games: it gives you a ton of stats along with the best active ability for squishy INT supports that always get targeted by the enemy carry. The downside? It consists of one big expensive item.
|
Situational
Late Game Items

|
|
I don't usually recommend this item, unless you are switching into a semi-support role because you got a lot of farm or your team is simply stomping the enemies: this item can be treated like a second  Demonic Purge when you don't want to waste your ultimate and its cooldown. Demonic Purge when you don't want to waste your ultimate and its cooldown.
|

|
|
A support Hero has to buy items for his team, so why don't you get a cheap aura that scales into late game like Vladmir's Offering? In organized matches carries usually skip it to buy DPS or durability items, so you can think about this if your team counts 2-3 melee Heroes.
Don't buy this item if another Hero in your team already has one or you'll waste 2050 gold.
|
Playing Style
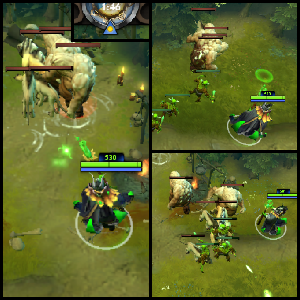
In the laning stage Shadow Demon is simply a trilane support that grants a good initiation to get a kill, but he becomes an awesome disabler in teamfights: this Hero can single-handedly turn a teamfight in your favor Disrupting the enemy initiator while casting Demonic Purge and Soul Catcher on the carry.
This chapter will be divided in the following paragraphs to let you understand better:
Aggressive Trilane
This is the default lane you should be playing in,
top for
Radiant and
bot for
Dire.
The first thing you and your lane partners want to do is to decide how to chain your disables and slows in order to get quick kills: here I'll show some examples of chain stunners you can use in the hard lane:
Another cool thing you can do in the hard lane is pulling the big creep camp if you can chop a tree to let them pass through the hole (you can ask
 Juggernaut
 or other Heroes with a
 Quelling Blade
 to cut a tree for you if you don't have any
 Tango
Tangos left): getting the creep aggro at X:19 or X:49 is the best time, especially if there's a Dark Troll camp since they're ranged.
Sometimes the enemies might focus your other towers: if so, immediately use your
 Town Portal Scroll
 to teleport there and use your abilities to target an enemy Hero without escape mechanism.
If your lane is going well and your trilane semi-carry is free farming, you can go to place some Wards or smoke gank the mid or safe lane.
If you realize the enemy support has just pulled the creeps to the neutrals, you can try to go for an easy gank if the enemies don't have any Wards spotting you: with your
 Disruption
 and the follow-up stuns, the enemy will have little time to react.
Safe Trilane
A rather usual lane for SD, you can opt for a safe trilane (
bot for
Radiant,
top for
Dire) either if you are sure you'll encounter an aggressive trilane or you need to babysit a hard carry.
If you are looking for good safe trilanes, here there are some suggestions:
- Shadow Demon -
 Lina -
  Phantom Lancer
First thing, you and Lina will harass the hell out of the enemies, thus making farming for Phantom Lancer (which has a rather low base damage) much easier. Second, you can easily catch an enemy in a bad position and punish them: Disruption and Soul Catcher come first as usual, then Lina won't have any problem casting her  Light Strike Array and
  Dragon Slave. At the end, your trilane's carry can slow the target down with
  Spirit Lance and autoattack them to death.
- Shadow Demon - Nyx Assassin -
 Lifestealer
One of the most popular safe trilanes, this works wonders: the  Mana Burn coupled with
  Open Wounds will make impossible for any kind of enemy to escape from Lifestealer's
  Rage, which will deal insane amount of damage thanks to your Disruption + Soul Catcher combo. The best thing about this setup is that in the mid-late game N'aix can hide inside the invisible Nyx Assassin (thanks to
  Vendetta), which leads to awesome initiations.
- Shadow Demon -
 Shadow Shaman -
  Ursa
Ursa
This trilane is made to let your carry farm fastly and effectively while granting easy kills. After you initiate the gank with your Disruption and Soul Catcher combo, your partner can follow up with his  Shackles (and then
  Hex if the enemy is still not dead) and let Ursa use his
  Overpower at his best. Notice that the shackled enemy will take damage from the disrupted illusions, too.
If your enemies are smart, you will probably find your creep pulling camp blocked. That's why you need
 Sentry Ward
s: use them to spot and destroy the enemy
 Observer Ward
 before the first minute, so that the creeps will spawn at 1:00.
Always creep pull if the enemies aren't pushing: if so, your carry will farm better because of the safe last hits under your tower.

Image
Since 6.79 you'll find small creeps isntead of medium ones; the process is still the same.
When you're in the safe lane never, and I repeat
never, take experience from the carry: maybe stay in the exp range until you reach lvl 2 if you can't creep pull, but then let him take all the levels. This is one of the fundamental tips about trilaning.
If the enemies gave up and your carry is free farming, don't stay there! Take advantage of this and go to place Wards or gank other lanes: this is the best moment to use your
Smoke of Deceit.
Teamfights
As your team takes down the first tower (that's probably what will happen if you have an offensive trilane) you can start grouping up for teamfights: the hardest carries will keep on farming, but your team will have a great advantage as you got the enemy safe lane; their carry will be obliged to farm in jungle or in other lanes, which will open your path for ganks.
How would a hypotetical teamfight start? Most likely, your team will have an initiator that will bump into the enemies: if so, then watch out for counter initiators and use
Disruption on them while targeting the carry with Soul Catcher and
Demonic Purge.
Then, unless the enemies have a big disabler (such as
 Disruptor
 or
 Naga Siren
), the teamfight is in your favor. Just rember to autoattack and actively use your skills and your items (
 Urn of Shadows
,
Drum of Endurance and
Mekansm, mostly).
One thing that pub players often skip is destroying the tower you fought for: if you succeed in a clash, quickly push to the enemy tower! Have one of your teammates (
 Axe
Axe,
 Keeper of the Light
,
 Leshrac
...) kill the creeps before they reach the friendly ones that are attacking the tower.
Late Game Item Choices
This is one of the most important things as it classifies your level of experience as a Dota 2 player: there are some items that are easy to avoid in certain situations (picking
Vladmir's Offering with a
 Wraith King
 in your team or a
Ghost Scepter if the enemy team is full of nukes), but you should always look for the items your team needs.
- If you are getting plenty of kills in your lane you can go to destroy the towers and get other pushing items such as Drum of Endurance or
 Necronomicon, so you can keep their lanes under pressure.
- If you are having troubles with survivability always go for a Ghost Scepter or a Drum of Endurance which give good stats along with useful features and a relatively cheap price.
- If your team always wins teamfights you can try to get items which make chasing those fleeing Heroes much easier: this is the situation in which
 Eul's Scepter of Divinity, Force Staff and Rod of Atos (which also solve your mana problems with that Shadow Poison) shine.
- If you have three (or even two) melee Heroes in your team that don't have any sort of lifesteal, don't think about it twice and go for a Vladmir's Offering.
- If you need to come online faster for teamfighting in the enemy base you should opt for the
 Boots of Travel, an item that can even let you push with ease thanks to your Shadow Poison.
Friends and Foes
Friends
Shadow Demon can go well with many Heroes in a trilane, especially in an aggressive one (which means three Heroes in the hard lane): when you're playing with this Hero make sure the other trilane support knows what to do and you'll get a lot of kills.
First, your favourite lane partners are those Heroes able to deal a mix of stuns, nuke damage or even slows and disables. For an aggressive trilane you should be laning with (the first line is for supports, the second line is for semi-carries):
A special mention goes to
Leshrac for being the best partner ever: in my opinion SD + Leshrac is the best roaming support duo for obvious reasons.
Also, a trilane with
 Kunkka
 always leads to free kills unless the enemy trilane can stop yours.
If you're playing in a safe trilane (so you are kind of babysitting the hard carry), you might want to play with carries that maximize the usefulness of your Soul Catcher: Heroes with big stuns, slows or burst damage are the best options:
Obviously, the other trilane support should be one of the support Heroes listed above.
Heroes that you're useful against
So, now you know which Heroes pair well with you, but you don't actually know when
Shadow Demon is a valid counterpick. Of course you may choose SD as a first pick to get an awesome offensive trilane, but you might find more useful waiting for the wrong enemy pick that makes this Hero even
more useful.
First, let's talk about your
Demonic Purge: you should know that it actually purges some buffs and destroys some units, like
 Warlock
's golem:
If the enemy picks one of these Heroes you're going to have a really great time: you will istantly remove
 Guardian Angel
,
 Repel
Repel and
 Bloodlust
 while slowing and damaging the target and you will be able to instakill any Golem by just activating your Purge.
Funny Heroes to deal with:
If the enemy team has either
 Alchemist
 or
 Slark
Slark and they aren't very smart, you can disrupt yourself before the activation of
 Unstable Concoction
 or
 Dark Pact
 and laugh at them as they lose a lot of health, especially in the early game.
Against
 Pudge
Pudge, if you spot him with your Wards you can disupt yourself right before the hook comes to get you. If you get caught anyway, just disrupt him before he can use his ultimate.
Foes
This Hero hasn't really got any foes aside from the typical silencers and stunners/disablers that annoy every INT support: they might be annyoing in a 1vs1 fight, but most of the time you should be in the middle of a clash. They are:
And still, your favourite lanemates can even be your worst enemies if they're on the other team: trying to save a teammate with a
Disruption might be a perfect setup for a
 Sacred Arrow
 or
 Split Earth
.
Vote My Guide!
This build has been published in the new Steam Community "guides" section: vote it from here if you want to see it in game!
Update History
2-2-2014: Edited the starting items and some mid-game items.
2-12-2013: Added situational items.
2-7-2013: Added Kunkka between Shadow Demon's friends.
2-6-2013: Added the "Playing Style" chapter.
2-5-2013: Wrote the first part of the guide.


 Animal Courier


Quick Comment (24) View Comments
You need to log in before commenting.